Buenos dias muchachos!
The truck’s behavior being satisfactory, I decided to get the final in-game view (or close to what it’ll be). So I switched to a more classic side view (I’ll keep it like that for now, maybe forever) and decided to create a “dynamic” camera that reacts to the speed of the truck and that is smooth.
It took me a little time to get a decent result, the first thing I tried was depending directly on the speed and – logically – ended up being too rough.
So after a little research, I found in the Unity (online) documentation Vector3.SmoothDamp, which didn’t work quite as intended, probably because I’m using it in 2D instead of 3D? Not sure, but what is shared in the documentation was affected by the rotation of the truck on the Z axis, which was leading the camera to either move up or down on the Y axis (in the air), depending on the rotation.
Instead of using
Vector3 targetPosition = target.TransformPoint(new Vector3(0, 5, -10));
I used
Vector3 targetPosition = new Vector3(some stuff here that I’m about to show you);
First, the code that works:
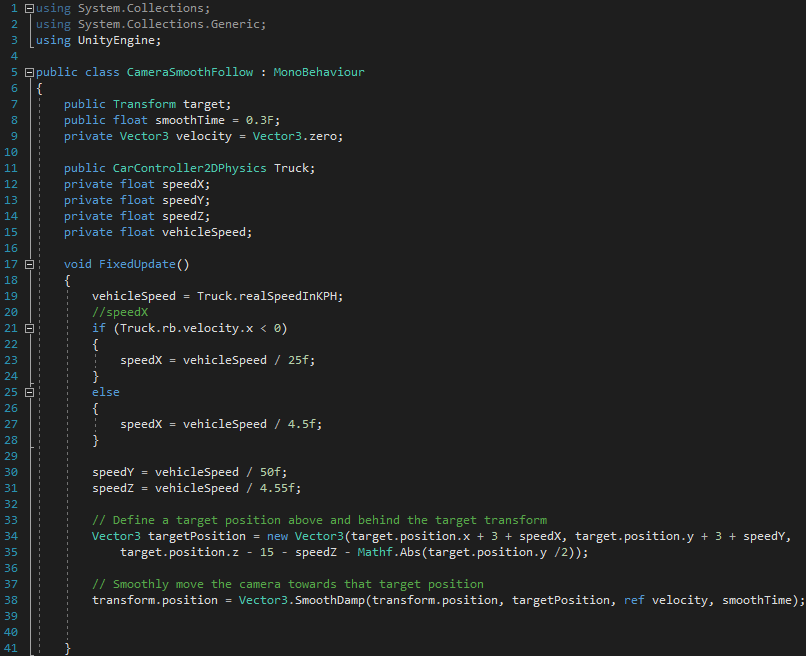
I’m not sure that’s the right way to do it, but Jack65423 (one of my most diligent neurons) suggested me to consider the camera as a moving object between 2 positions (each position being given specific coordinates x, y, z). So the camera’s position at the start would be (relative to the followed object, here the truck) (3, 3, -15).
Little Jacky then told me to set the camera as I wished it to be at full speed (moved and zoomed out) and to write down the coordinates. I got (9.8, 4, -26). Those would be the numbers we’d get when the truck is at its maximum speed (50km/h in that case). So at 0km/h, we have (3, 3, -15), and at 50km/h (9.8, 4, -26).
By doing an extremely complicated subtraction, we can see how much the coordinates must “evolve”.
For example, for the Z axis, I created the speedZ value that is equal to the vehicle speed divided by 4.55. Where does 4.55 come from? I divided 50 (the max speed) by 11 (the difference between the final coordinates and the original ones). 50/11=4.55 (approximately).
Actually, for speedX, it should be around 7.4, but I wanted the camera to move much more to the right side in order to let the truck appear on the left, hence giving the player a better view of what’s to come on the road.
speedX, Y and Z vary depending on the speed, which means they are equal to 0 when the truck isn’t moving, and they’ll reach the desired end value when the speed is at its maximum.
Knowing that, Bob687 finished the job with the Vector3 formula.
In case you don’t know, it’s Vector3(x, y, z).
Which gives us:![]() For x: target.position.x + 3 + speedX
For x: target.position.x + 3 + speedX
For y: target.position.y + 3 + speedY
For z: target.position.z – 15 – speedZ – Mathf.Abs(target.position.y /2)
Why is z so different? Because I noticed that when the truck goes high and jumps, the ground disappears and it’s not possible to anticipate anything (and honestly, it doesn’t look pretty). So I added one more thing that depends on the position of the truck on the Y axis. I divided by 2 so that the zoom out wouldn’t be extreme. Now it looks quite natural.
Oh yes, to zoom out (on the Z axis), the camera goes into the negatives, therefore it is necessary to subtract.
Also, because the truck goes up and down on the Y axis, I added the Mathf.Abs so that even when the Y is negative, it’s converted into a positive and the camera won’t zoom in unexpectedly (although I haven’t tested it, but I believe it should work).
The special case of speedX
You may have noticed I used a condition to define speedX. The reason is simple: if the truck moves forward, the camera will behave as intended the truck appears at the left side of the screen). But I the truck moves backward, then what? It’ll disappear! To counter that, I made a simple condition based on either the truck is moving to the left (Truck.rb.velocity.x < 0) or not. And depending on that, the value of speedX is different.
That simple!
/!\ NOTE : in order to have access to Truck.rb, you must change (if you haven’t done it yet), in the truck’s script, private Rigidbody2D rb; into public Rigidbody2D rb; .