Hello wello wello!
In a game, knowing the speed of a few objects may be extremely useful. In a car game, almost mandatory. In a 2D-view car game, probably not, except that in my little project, I plan to add speed limits, or else it’s the fine (or whatever punishment I’ll come up with)! I’d like to add radars here and there (popping “randomly” would be fun), therefore being able to know AND display the speed is not an optional feature.
I found a few tutorials, a few weird, one that worked well (YouTube – “3D Racing Game in Unity – Speedometer” by besnik) although the author wasn’t precise enough about importing the pictures that one would want to use as the display. So allow me to add some details to that process (after you’ve watched the video, that is).
Design first
When following a tutorial (or a recipe, a manual, etc.), it is in my opinion better to read it all beforehand to anticipate what might be better to be done first. I’m not saying that there is ONE way to do things, we don’t have the same brain, and so the way we approach things may greatly differ. But in my case, I decided that having the base of the design first was easier.
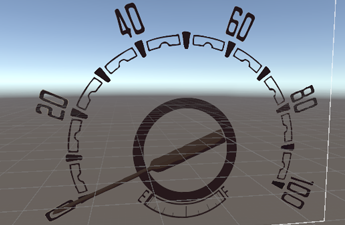
The principle is based on rotating a needle between the starting position and the final one, which means between the minimum speed (0km/h in my case) and the maximum speed. You know that when we talk about rotation, we talk about axis.
The tutorial I followed taught how to make a 2D speedometer, based on pictures. It is very important, because the way things rotate are totally different whether it is a 3D object, or a sprite. What you must keep in mind is that when using a picture, the center of the picture is the rotation axis (or maybe I missed something somewhere, but that’s how I based my stuff in that case).
This is NOT a tutorial, so I’m not going to explain the setting up with the UI and all. I don’t really understand all the options, as some don’t seem to be affecting my scene, so I’d rather not teach wrong stuff (I leave that to others, haha!).
In the video, around 1min30, the author shows us the pictures he is about to use to make the speedometer, but doesn’t provide any information as to how Unity handles pictures.
Let’s say you plan to use your own images. So you’ve got your needle, and your background that displays the speed (and whatever else you wish to use). In order to have everything behave decently, you must understand how Unity sees the axis. And unfortunately, it sucks. I really feel using a software from the Middle Ages after having used a 3D software such as Cinema 4D or 3DSMax. Why? Because Unity does NOT allow the user to modify the axis. Heresy! Heresyyyyyy!!! Especially when it comes to 3D! Seriously, in 2020?! I have read on the web many people complaining about that. I wonder if it’s the same in the Unreal Engine. I hope not…
From all that I have tried and read, it seems that there is no way to change that, and I apologize if there is one (please let me know! That would save me some hassle!).
From what I understood, Unity will set the axis as the center of “mass” of the image, and there is no way to change that (is there?). Whereas in Photoshop (for example), one can choose where to place it (by holding ALT and clicking). And because it is not possible in Unity, one must anticipate how the needle will behave regarding its surroundings (the background or other things in the UI).
How a needle behaves
In your favorite web search engine, type “car speedometer”. You’ll see that there are many types. I personally looked for a vintage design because the truck is a very old model. This is the image I chose as a model: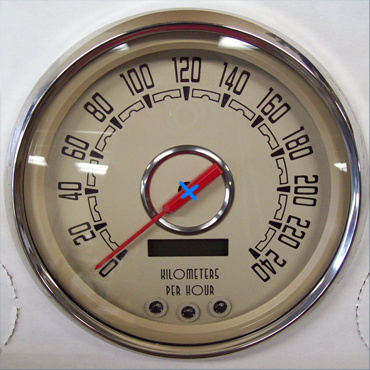
I made a blue cross that approximately shows the center of the speedometer AND the axis of rotation. It is very important because the needle must move accordingly.
The needle’s movement is circular, even though it won’t make a whole circle (like the speed display isn’t a full circle). But it’s a picture, and in general, whatever its content, a picture is understood and treated as a rectangular/square shape. As I am using a circular based image, I thought that using a square image would make more sense. Needless to say (even though I’m saying it) that the circle/display and the needle’s axis of rotation have to be perfectly centered inside the picture.
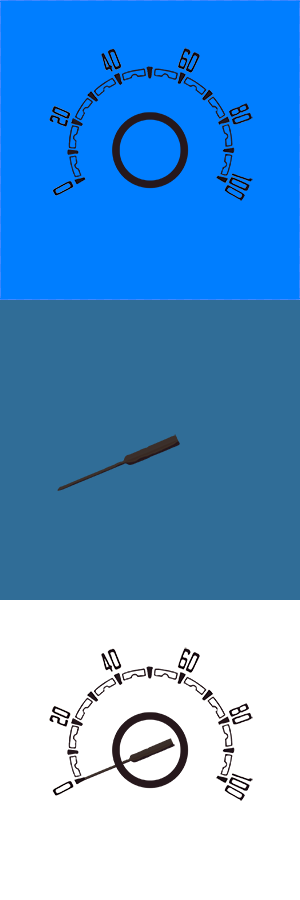
As I wrote above, it is possible to move the axis in Photoshop, but I really doubt Unity would take it into consideration at all. Which is why everything must be centered well. So I made my pictures square (1432*1432), so that I could center my stuff well without any bad surprise. I also modified the background to get the max speed at 100, and not 240km/h (come oooooon, what the hell is wrong with the car makers, stupid outlaws!). Here are the 2 separate images (the background is transparent, but for the sake of that article I added one), and how it looks once they are put together:
For a few lines
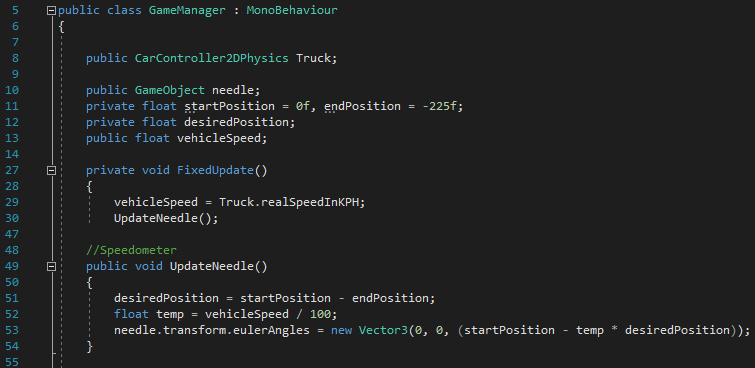
Then the code is pretty straightforward, as seen in the video. I don’t remember having tweaked it (unlike what’s to come next), so there shouldn’t be anything special. The only thing that must be done with care is to get the right value of the needle’s angles at its start and end positions. So in my GameManager script, this is what I’ve got (I cut the code on purpose to show you only the relevant part, otherwise you might wonder what the rest is for):
I HAD TO do something a bit special about the speed calculation of the truck. Why “had to”? Because again, something that Unity should be easily handling is being a problem. Again, I searched on the web, and it seems that it is not my fault, however I’ve really come to wonder if it wasn’t me who sucked like shit…
Put simply: even when the truck is stopped – and by stopped I mean that your eyes see it completely immobilize (like, pixels even appear frozen) – it actually isn’t. Its values are still changing, and even though it is extremely low, it has an impact on the overall data. So I came up with a poor trick (for a change…), but I do affirm that it should NOT be happening in a software with which one is supposed to be making a little game easily. So far, it hasn’t been. Here we are, in my truck’s script:
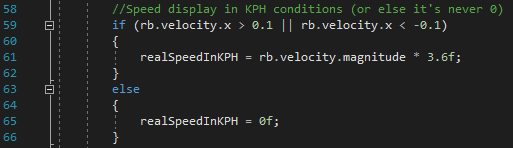
Basically, to get the truck’s speed, you only need
realSpeedInKPH = rb.velocity.magnitude * 3.6f;
Because I’m a nitpicker, to me 0 equals 0, so I want to make sure that my speed value won’t vary at all (just imagine the needle to be shaky whereas the truck isn’t moving a millimeter), I added a condition saying that if the truck’s velocity is between -0.1 and 0.1 (which means it’s virtually immobile), then the value of my speed is shown as 0.
It’s that simple :)
In the next article, I’ll show you how, based on that tutorial, I added a fuel gauge. Now it’s becoming messy! XD